Natural light is one of the most beautiful and versatile light sources available to photographers. Unlike studio lighting, it's free, constantly changing, and offers incredible variety. Learning to work with natural light effectively can transform your photography, whether you shoot portraits, landscapes, or still life. In this guide, we'll explore techniques for harnessing natural light to create stunning images in any environment.
Understanding Natural Light Qualities
Before diving into specific techniques, it's important to understand the different qualities of natural light:
Hard Light vs. Soft Light
- Hard light (direct sunlight on a clear day) creates strong contrasts, defined shadows, and vibrant colors. It can be dramatic but challenging to work with.
- Soft light (overcast days, shade, or golden hour) produces gentle transitions between light and shadow, flattering skin tones, and more even illumination.
Direction of Light
- Front lighting (light source behind the photographer) evenly illuminates your subject but can appear flat.
- Side lighting reveals texture and creates dimension through shadows.
- Back lighting (light source behind your subject) creates dramatic silhouettes or beautiful rim lighting.
Color Temperature
Natural light changes color throughout the day:
- Early morning and late afternoon light has a warm, golden quality (lower Kelvin temperature).
- Midday light is cooler and more neutral (higher Kelvin temperature).
- Overcast days produce a cooler, bluer light.
The Golden Hours: Magic Light for Photography
The hours shortly after sunrise and before sunset are known as the "golden hours" and are prized by photographers for several reasons:
- The light is directional but soft, creating a beautiful balance.
- The warm, golden color adds a magical quality to scenes.
- The low angle of the sun creates long, dramatic shadows that add depth.
- The intensity is lower, reducing harsh contrasts and making exposure easier to manage.
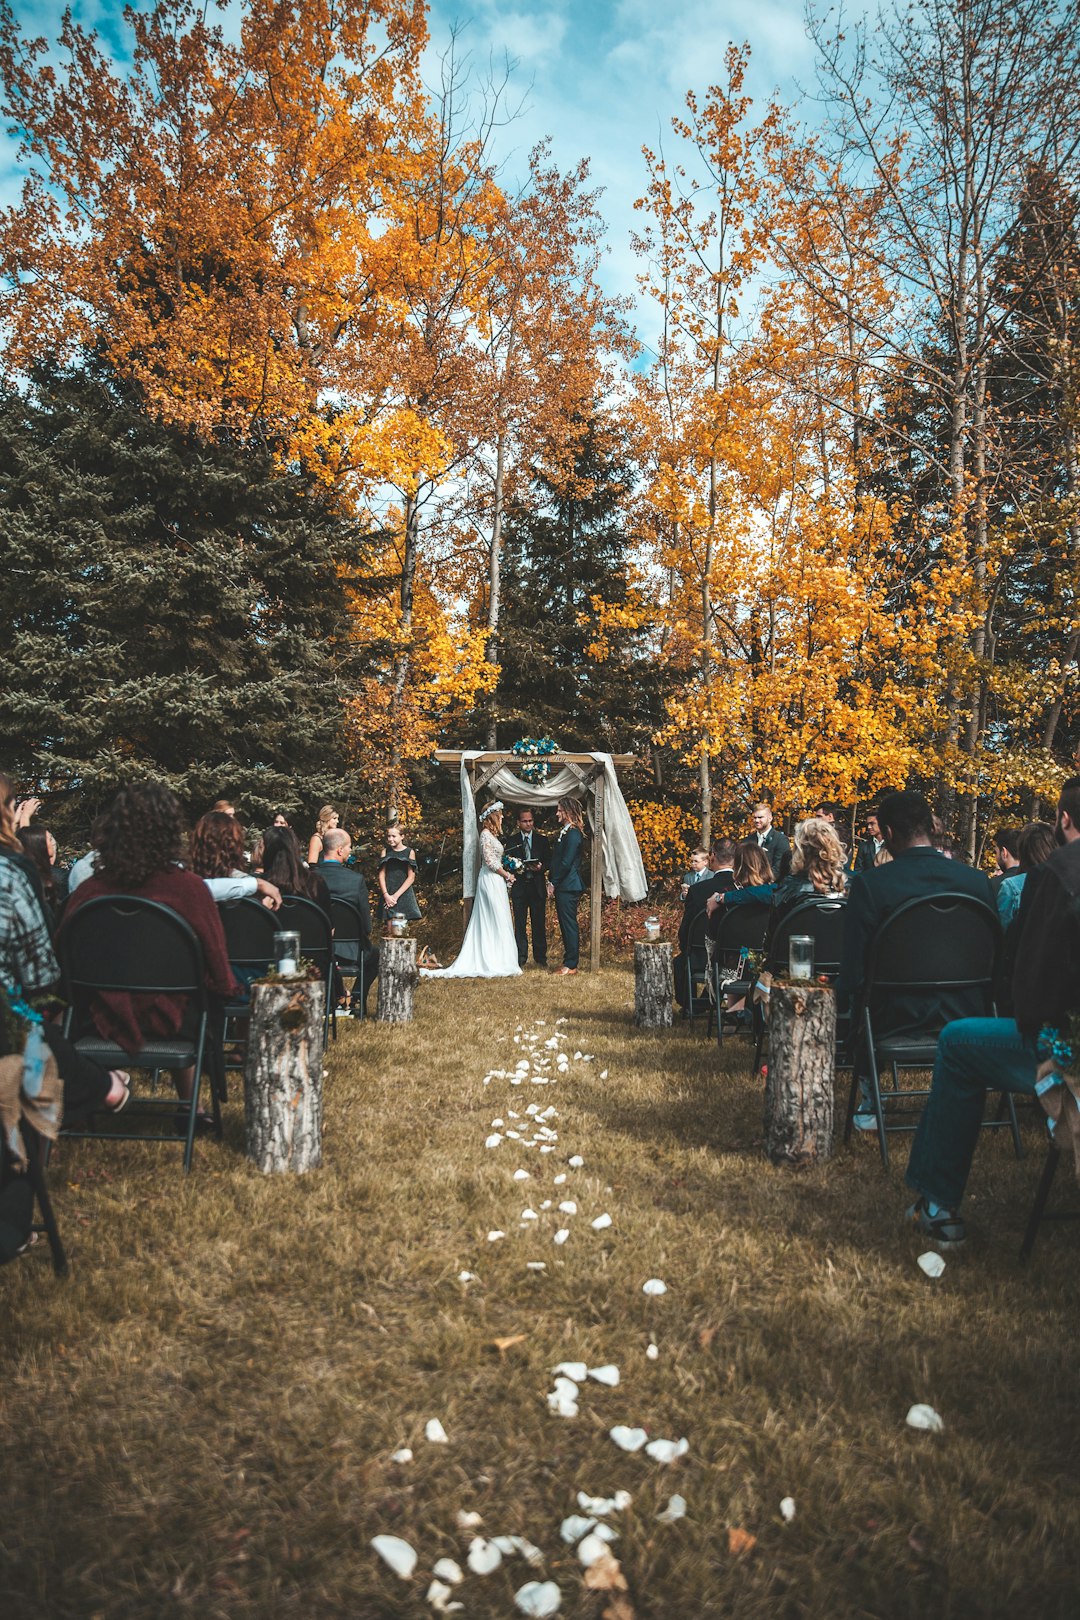
Portrait taken during golden hour showing the warm, flattering light
Pro Tip: Plan your shoots around these times by using apps like PhotoPills or The Photographer's Ephemeris, which can predict exactly when and where the sun will rise and set at your location.
Overcast Days: Nature's Softbox
Many photographers dread cloudy days, but overcast conditions actually create ideal lighting for many types of photography:
- Clouds act as a giant diffuser, creating soft, even light across your scene.
- Colors appear more saturated as there's less glare and contrast.
- You can shoot comfortably throughout the day without harsh shadows.
- It's excellent for portraits, as it flatters skin and reduces unflattering shadows under the eyes or nose.
Pro Tip: On overcast days, expose slightly to the right (slightly brighter) to maintain color saturation and avoid the flat, gray look that can occur in cloudy conditions.
Working with Harsh Midday Sun
While midday sun is often considered challenging, there are ways to work with it effectively:
Find or Create Shade
Placing your subject in the shade of a building or tree instantly transforms harsh light into soft, flattering light. Look for "open shade" where your subject is shaded but still facing an open area of sky for good illumination.
Use a Reflector
A simple reflector can bounce light back into shadowed areas of your subject, balancing the contrast created by direct sunlight. You can use:
- White reflectors for subtle fill light
- Silver reflectors for stronger fill
- Gold reflectors to add warmth
Create Silhouettes
If you can't beat the harsh light, use it creatively! Position your subject against the bright sky and expose for the background to create dramatic silhouettes.
Use Spot Metering
In high-contrast situations, use spot metering to expose correctly for your subject's face rather than the entire scene. This is especially useful for backlit situations.
Mastering Backlight
Backlighting (when the light source is behind your subject) can create magical effects when handled correctly:
Rim Light/Hair Light
Positioning your subject with the sun behind them creates a beautiful glow around their outline, separating them from the background and adding dimension.
Silhouettes
For powerful silhouettes, place your subject against a bright background and expose for the background, allowing your subject to fall into shadow.
Lens Flare
Allowing some sunlight to hit your lens directly can create artistic lens flare. This effect can be used creatively to add atmosphere, though be careful not to overdo it.
Backlit portrait showing rim lighting effect
Pro Tip: When shooting backlit, use spot metering on your subject's face and possibly expose 1/3 to 2/3 stops higher than the meter suggests to maintain detail. A reflector placed in front of your subject can also help fill in shadows.
Window Light for Indoor Photography
Window light is one of the most beautiful forms of natural light for indoor photography:
Directional Quality
Windows create directional light that reveals form and texture. The larger the window, the softer the light; smaller windows create more defined shadows.
Positioning
- Side window light (subject perpendicular to window) creates classic Rembrandt-style lighting with beautiful dimension.
- Front window light (subject facing window) provides even illumination ideal for beauty shots.
- Back window light creates dramatic silhouettes or rim lighting.
Modifying Window Light
- Use sheer curtains to diffuse harsh direct sunlight.
- Place a reflector opposite the window to bounce light back and fill shadows.
- Use black cards or panels to create negative fill, increasing contrast and drama.
Pro Tip: For food photography, position your setup next to a north-facing window (in the northern hemisphere) for consistent, soft light throughout the day without direct sunbeams.
Weather Conditions and Creative Opportunities
Different weather conditions offer unique photographic possibilities:
Fog and Mist
Fog creates atmospheric depth, separating elements in your scene and adding mystery. It's perfect for landscape and environmental portrait photography.
Rain
Rainy conditions create reflections, saturate colors, and can add mood to urban scenes. The light immediately after rain is often exceptionally clear and vibrant.
Snow
Snow acts as a natural reflector, bouncing light upward and filling shadows. Be careful with exposure, as snow can trick your camera's meter into underexposing.
Essential Equipment for Natural Light Photography
While natural light is free, a few simple tools can help you control and shape it:
- Reflectors - A 5-in-1 reflector is versatile and affordable, offering white, silver, gold, black, and translucent options.
- Diffusers - A translucent panel can soften harsh direct sunlight.
- Negative fill - Black cards or foam boards can block light and increase contrast when needed.
- Polarizing filter - Reduces glare and reflections, especially useful for landscape photography.
- Graduated ND filters - Help balance exposure between bright skies and darker foregrounds.
Camera Settings for Natural Light
While settings vary depending on conditions, here are some general guidelines:
- Use the lowest ISO possible for the situation to maintain image quality.
- In changing light, Aperture Priority mode gives you creative control while letting the camera adjust for exposure.
- Spot metering is helpful in high-contrast or backlit situations.
- Bracket your exposures in challenging lighting to ensure you capture all details.
- Use RAW format to give yourself more flexibility in adjusting white balance and exposure later.
Conclusion: Embracing the Ever-Changing Light
The beauty of natural light photography lies in its infinite variety. No two days, or even hours, offer exactly the same light. Instead of seeing this as a challenge, embrace it as an opportunity for creativity. By understanding the fundamental qualities of natural light and practicing these techniques, you'll be able to create beautiful images in any environment.
Remember that some of the most stunning photographs happen when conditions aren't "perfect." Dramatic skies, unusual weather patterns, and unexpected light can lead to unique images that stand out from the crowd. Keep your camera ready, observe how light interacts with your environment, and never stop experimenting!
Want to Master Natural Light Photography?
Join our upcoming Natural Light Portrait Workshop to practice these techniques with professional guidance!
Learn More